
4 Steps to create a Telegram Photo Bot with ESP32-CAM
I purchased ESP32-CAM the other day just to see what are some of the capabilities. This is one of the low cost Camera webserver with tremendous amount of possibility.
One of the interesting possibility is to turn it into a Telegram Photo Bot.
If you haven’t been using Telegram, it is one of the messaging application like whats app, messenger or we chat.
For this function to work you will need the following:
- Telegram account
- Telegram Bot
- ESP32-CAM
So let’s get started:
Step 1: Get a telegram account if you don’t have one already.
Head to https://telegram.org/ and open an account or you can also download the app from Apple App store or Android Play Store.
Step 2. Create a Telegram Bot
Once you have a Telegram account you can create your own bot. To do this you need to search for BotFather

Once you find the BotFather, send a message “/start” and you will see the list of available commands.

To create a new bot, type “/newbot”. You will have to name your bot and create a username for the bot. The username needs to follow the naming convention of the bot. It is 5-32 characters long and case sensitive, but may only include Latin characters, numbers and underscores. It also must end in “bot”. So go and create your bot.

Once you have created the bot. Take note pf the API key as shown above. And make sure you kept it secure, as whoever have the key can control your bot.
You can click on the link in the message that contained t.me/<robotname> to access your bot. Then you can click on “Start” button to start your bot.
Step 3. Testing your bot with echo message
First we will test the bot with the Echo message. But before that you will need to update the ArduinoJson Library. Go to Tools->Manage Library and search for ArduinoJson. Install the latest ArduinoJson (at the time of writing I am using version 6.15.2).

Then you will need to download the Telegram Bot Library you need to download the version 1.2. Then unzip into your Arduino library folder.
Compile and upload the “EchoBot” sketch from File->Examples->UniversalTelegrambot->ESP32->Echobot
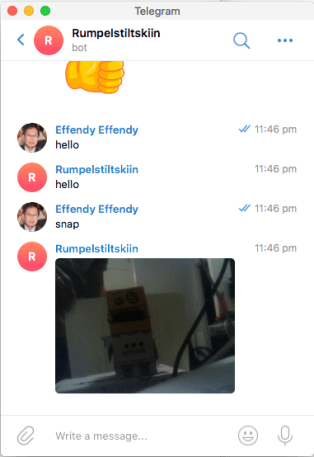
Once the the code is executed. Type a message to your chat bot in Telegram. If all goes well you should be getting the echo of the message back. Similar to the following picture.

Step 4. Creating the Send Photo Bot
Now that you have successfully created the EchoBot, it is time to upgrade it to have the capabilities to send picture at your command.
Compile and upload the SendPhotoBot sketch to your ESP32. So if you send the “snap” message to the bot, the ESP-32 will take a photo and send it back to your phone or desktop.
Final thoughts and future upgrades.
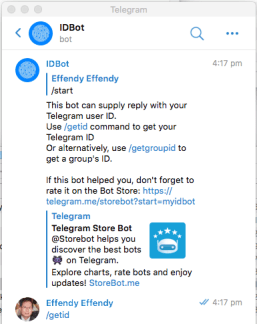
Now that you can send take control of your bot, it is time to make it secure, make sure you setup your id and only allow the bot to response to your id. To check your id you can send “/getid” message to IDBot as shown in the following picture. This will make sure that your bot only response to you.
I hope you enjoy this post as much as I do. Subscribe if you would like to get more of this type of post.